Creating CRUDS applications with XRX in eXist
This is a beginner's guide for creating a new XRX application with eXist-db (hereafter, eXist). XRX stands for XForms, REST, XQuery, the three technologies tied together to create applications.
This guide intended for people who are new to eXist and are interested in building their first web applications. It demonstrates the minimal code necessary to create applications that perform CRUDS operations (Create, Read, Update, Delete, Search). Creating your first application can be somewhat tricky, since there are several structures that need to be "wired" together correctly. This example tries to use as little code as possible and yet still cover many of the key components of a fully functional XRX web application.
Introduction
Creating a new web application from scratch is a core skill that is necessary to understand the power of the XRX (XForms, REST, XQuery) web application architecture. Once users understand how XRX applications are constructed, they can quickly become productive building new web applications. They also have a much better understanding of the complex portions of the XRX application and why these portions are usually automated in XRX frameworks.
This document is designed for new eXist users who would like to create their first XRX application. For this process we assume that you have a basic understanding of XML and understand concepts such as XML elements and XPath expressions. You should also be somewhat familiar with very basic HTML markup, including the structure of an XHTML file and use of HTML lists and HTML tables. We will also be describing how XQuery is used to create a listing of items and viewing an individual item, so please review the basic structure of an XQuery FLWOR expression (for, let, order by, where, and return) and basic XQuery syntax. Familiarity with the fundamentals of XForms is helpful, but this guide will explain each of the XForms elements used in the example.
Please note that there are several easy-to-use drag-and-drop GUI tools available that can create XForms, and there are systems that can also automatically create a fully functional XRX application directly from an XML Schema. But using these tools and frameworks hide much of the inner workings of an XRX application. So this tutorial is for those that want to have a clear understanding of how XRX systems work.
Getting Started
To use this guide you will need to have following tools in place:
eXist: You will need to have eXist running on your local system. By default eXist runs on port
8080so that when you set your web browser to http://localhost:8080/exist/ you should see the eXist homepage come up.You can also run this tutorial on a remote eXist server. If you are doing this, you must replace the server name
localhostwith the name of your remote server. Make sure that you take into account the port number: it might not be8080. If there is no visible port number, then the server is running on the default HTTP ports80or HTTPS port443.XML and XQuery Editor: You will need some tool to edit XML and XQuery files. We encourage you to use the eXide web application, which is included in the default eXist installation, or oXygen XML Editor, since these tools have special additions to make editing XML and XQuery files easy. Simple text editors such as Microsoft Notepad will work but will not give you immediate feedback when there are syntax errors in your files, nor do they perform syntax highlighting.
File Uploader: You will need some tool to transfer your files directly to eXist. Tools like eXide or oXygen can save directly to the eXist database. You can also use a WebDAV client to copy the files. As a final option, you can also use eXist's Java Admin Client to upload files.
XForms: You will need some XForms client libraries. This example will use the XSLTForms client which can be installed using the Dashboard package manager. Please install the XSLTForms Files package.
Terms and Concepts Used
This example will use the following terms and concepts:
XRX is the name of the web application architecture that we are introducing in this guide. The term XRX comes from the combination of XForms, REST, and XQuery. The term was coined by Dan McCreary. XForms are used in the client (web browser), REST is the interface between the client and the server, and XQuery is the server language. Two of the most significant advantages of XRX over other architectures are: (1) it does not require users to translate data into Java or .Net objects, and (2) it does not require users to "shred" documents into rows of a relational database.
XForms is a W3C standard to define the structure of a web form. XForms is much more advanced than traditional HTML forms, but can appear intimidating to the first time user. However, most simple forms need only a few control types, and these can be quickly learned. XForms binds user interface controls to each leaf element in an XML instance. XForms stores the data in a model element in the HTML HEAD tag and then binds the leaf elements in the model to web input controls.
XQuery is a W3C standard query language for selecting and transforming XML structures. If you don't have programming experience, XQuery is not hard to pick up. If you do have programming experience, XQuery is a little different than other languages you may have used in the past. It is a "functional" programming language that makes it very easy to create robust server-side programs—without struggling with the managing the "side-effects" that many other languages introduce. XQuery is similar to the SQL language in some ways, but it is specifically designed for XML structures. Paired with an XML database like eXist, XQuery is an ideal language for creating web applications. eXist's highly efficient indexing makes full text searches and other queries very fast, even when working with gigabytes of XML data.
Note for New XQuery Users with Programming Experience
in Other Languages. There are some things that are very different in
XQuery that you should be aware of. In general, all XQuery variables are
immutable, meaning that they are designed to
be set once but never changed. So functions like let $x := $x + 1
within loops will not increment like in procedural languages. There are also
restrictions on what can be done inside FLWOR statements.
REST is at the heart of the architecture of the
World Wide Web. We use the "RESTful" approach to passing information around in our
XRX application by simply placing parameters at the end of a URL. For example, to
pass a query keyword to a our XRX application search service, our form appends the
parameter q=myword to the URL: search.xq?q=myword. If you
have ever used a SOAP architecture, REST is a breath of fresh air. No complex SOAP
interface testing tools are required. All you need to test your web services is a
web browser. For example, the home page of the test application under the default
configuration will be http://localhost:8080/exist/apps/term/index.html.
Several additional terms and concepts are helpful in understanding the XRX approach:
WebDAV is a protocol for transferring files, and we use eXist's WebDAV interface to move files to and from eXist and to list files in eXist collections. If you want to add a folder to eXist you can do this through the WebDAV interface. When you use oXygen or other editors you will also use the WebDAV interface.
Model-View Bindings is the term we use to
describe how user interface elements (controls) within a form are associated with
leaf-level elements within the XForms model. This is similar to the
Model-View-Controller (MVC) architecture in other systems, but in the case of XForms
event controls are part of the views. By using XPath statements in the
ref attributes for user interface controls, the browser constructs a
dependency graph to keep the model and views in sync. This makes forms development
much easier since the form developer never needs to manually move data between the
model and the views.
Convention over Configuration is a common practice among modern web application frameworks like XRX of using conventions such as standardized collection and file names, to reduce the amount of configuration and thereby reduce the complexity and time required to prototype and complete applications. Of course, users have the ability to change these conventions, but they then take responsibility for maintaining their own adaptations or separate frameworks.
Collection and File Conventions
The first convention of XRX applications involves the data collections and files that will structure our application. Although you do not have to use the collection conventions used in this example, you will find that frameworks that use this convention will be much easier to build and maintain.
Here are the conventions we strongly recommend you use for your first application:
Apps: XRX applications should be stored within the /db/apps parent collection.
App: Each XRX application should be stored a collection whose name reflects the function of the application. For example, our business term application might be stored in the
/db/apps/termscollection. The convention is to use the plural ("terms" rather than "term") for the primary kind of content being stored in the app.Data: Each XRX application should store its data in a discrete data collection. For example, our term manager application will store all the data in
/db/apps/terms/data. In this example the first term will be stored in the file1.xmland the second in the file2.xml, etc. When the user saves new terms, we can increment a counter to add a new term.Views: Each XRX application should store read-only views of the data in a
viewscollection. In our example, the term manager will store read-only views of the data in the/db/apps/terms/viewscollection. Note that views are all functions that transform but do not alter the original XML data. Views collections are usually visible to all users that have read access to data. Views do not need to worry about locking records to prevent missing updates. Tools that do change or edit the data can be stored in another collection such asedit. This allows access control systems to limit who changes or deletes data.Edit: Each XRX application should store its edit functions in a collection called edit. For our term manager application this would be
/db/apps/term/edit. Edit function include saving new terms, updating terms and deleting terms. By grouping all edit functions together it is easy to deny access to users that do not have permission to change items and to create consistent logging functions for audit trails.Search: Each XRX application should store its search functions in a collection called
search. For our term manager application this would be/db/apps/term/search. There are two functions stored here. A simple HTML search form (search.html) and a RESTful search (service.xq). Advanced applications sometimes combine these functions into a single XQuery that generates HTML.In addition to these two search functions, an additional collection configuration file, called
collection.xconf, must be stored in the/db/system/config/db/apps/terms/datacollection that describes how the files are indexed for search.Application metadata: To facilitate interchange of applications, the EXPath Community has created a specification for application metadata, called EXPath Packaging System. eXist supports and extends this module. This tutorial will not cover this file's structure, but you can learn more about this by reading about the Package Repository.
You are always free to change the names of the collection or the queries, but as
mentioned above, you will have to take responsibility for your own frameworks and you
may lose some of the benefits of using the common conventions. The reason for using a
generic file name such as list-items.xq instead of a filename that reflects
the data, such as list-terms.xq, may not be clear to you at first, but as
you will see later, this more general file naming convention has it merits when many
applications are being managed.
Example Data: Business Terms
In this example we will use a simple registry of business terms that might be used in a glossary of terms on a web site. Each term will have (1) a numeric ID, (2) a term name, (3) a definition, and (4) a publish-status code of "draft," "under-review," or "published."
To illustrate this structure, the following is a sample XML file for one of our terms:
<term>
  <id>
    1
  </id>
  <term-name>
    Declarative Programming
  </term-name>
  <definition>
    A style of programming that allows users to declare their requirements (what they want done) and leave out the details of how the function should be performed.
  </definition>
  <publish-status-code>
    published
  </publish-status-code>
</term>
We will create an application that will allow users to edit these terms on a simple form that will use a simple input field for the name, a text area for the definition, and a selection list for the status codes.
Views
We will create two XQuery services for our initial XRX application. The first is a
simple XQuery that will list all the terms in our data collection that have the root
element <term>. The second is an XQuery function that shows an individual term.
The second requires a single parameter which is the ID of the term. We will allow the
user to drill down to see an individual term by first viewing a list of all the term in
a collection.
Listing Items
Our first task will be to create a simple XQuery program that will list all the
terms in our collection in an HTML file. To do this we will us a simple XQuery FLWOR
loop that gets each of the terms in the collection in succession and then converts
the XML into a HTML list item using the <li> tags. The convention to use in
this example is the file name list-items.xq.
/db/apps/terms/views/list-items.xq:
xquery version "1.0";
declare option exist:serialize "method=xhtml media-type=text/html indent=yes";
<html>
<head>
<title>Glossary of Terms</title>
</head>
<body>
<h1>Terms</h1>
<ol>
{
for $term in collection('/db/apps/terms/data')/term
let $term-name := $term/term-name/text()
order by $term-name
return
<li>{$term-name}</li>
}
</ol>
</body>
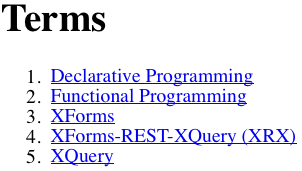
</html>This produces the following output:

There are few points to note here. First, we use the collection
function to specify the location of the data is being listed. We also return only
items in the data collection that have <term> as their root element. This
allows us to put other data types within the data collection without disrupting this
report.
Our next step is to change each of the items listed into HTML links so that we can view each individual item on a separate HTML page. To do this we change this:
<li>{$term-name}</li>
to be the following code:
<li>
  <a href="view-item.xq?id={$term/id/text()}">{$term-name}</a>
</li>
This produces the following output:
This has the effect of taking each term's ID and using it as a RESTful parameter,
so that when a user selects this link, the link to the view-item.xq
query will include the ID, and the query will know which term to display. We will
use the same technique many times. Note that this uses a relative path to the
view-item.xq program. So it is important to keep both the list items
and the view items in the same collection for this to work correctly.
Note that this works fine as long as we have just a few hundred terms. But as your collections get longer (usually above a few hundred items) you will want to add pagination. This is not covered here.
Viewing an Individual Item
Now that we have a list of all the items in a collection, we are ready to drill
down to a specific item and see all of the information about a single item. By
convention this is done by an XQuery file called view-item.xq. The item
viewer takes a single parameter that is the ID of the item. It has to perform a
query on all the items in the data collection to find only the item you are looking
for. This is done by adding a predicate or where clause to the query.
In general we prefer predicates because they are faster for eXist to process. The
predicate that selects our desired term appears in the square brackets in the
following expression:
let $term := collection('/db/apps/terms/data')/term[id='5']Note that the predicate [id='5'] indicates to the system that only a
term with an ID of 5 should be returned. (Also note the quotes surrounding
'5', which indicate that we are doing simple string comparison, and not
treating the IDs as integers.)
Our next step is to get the parameter from the URL to select the correct item.
This is done by using the function request:get-parameter. We then
display all the elements of the term using one element per line. Here is what the
source of the list-item.xq file looks like:
/db/apps/terms/views/view-item.xq
xquery version "1.0";
declare option exist:serialize "method=xhtml media-type=text/html indent=yes";
let $id := request:get-parameter("id", "")
let $term := collection('/db/apps/terms/data')/term[id = $id]
return
<html>
<head>
<title>Term {$term/id/text()}</title>
</head>
<body>
<h1>Term {$term/id/text()}</h1>
<dl>
<dt>Term ID:</dt> <dd>{$term/id/text()}</dd>
<dt>Term Name:</dt> <dd>{$term/term-name/text()}</dd>
<dt>Term Definition:</dt> <dd>{$term/definition/text()}</dd>
<dt>Term Status:</dt> <dd>{$term/publish-status-code/text()}</dd>
</dl>
</body>
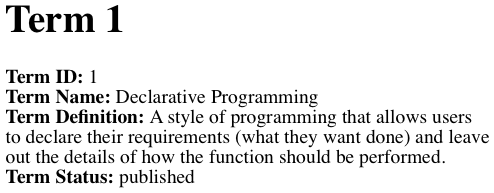
</html>This produces the following output:
Searching Items
There are three items that we create to support search functions. These items are the:
An HTML search form
A RESTful search service
A configuration file for defining the indexes
There are two types of indexes we will create. Structural indexes are configured to work with specific XML structures such as IDs. Fulltext indexes are used by eXist to make keyword searches very fast. These both work by indexing new content and optimizing the indexes for fast retrieval. Queries can run quickly and efficiently against the indexes rather than iterating through all files in the collection. In addition to the three files above, we therefore also have a script that reindexes the collection of terms.
Search Configuration File
The following is a search configuration file that we store in the collection
/db/system/config/db/apps/term/data.
/db/system/config/db/apps/term/data/collection.xconf
<collection xmlns="http://exist-db.org/collection-config/1.0">
  <index xmlns:xs="http://www.w3.org/2001/XMLSchema">
    <!-- Lucene index configuration -->
    <lucene>
      <!-- Use the standard analyzer will ignore stopwords like 'the', 'and' -->
      <analyzer class="org.apache.lucene.analysis.standard.StandardAnalyzer"/>
      <!-- an index boost can be used to give matches in the name a higher score. This means a name match will have higher rank then an match in the definition. -->
      <text match="//term/term-name" boost="2"/>
      <text match="//term/definition"/>
      <text match="//term/publish-status-code"/>
    </lucene>
    <!-- Range index configuration on the id attribute -->
    <!-- Most ids are integers but we will keep this general <create qname="id" type="xs:int"/> -->
    <range>
      <create qname="id" type="xs:string"/>
    </range>
  </index>
</collection>
This configuration file creates an index for the term ID for fast searching. It also creates a Lucene full text index for all words in the term name, term definition and term publish-status-code. (By using the repo.xml Deployment Descriptor's "prepare" field, you can automate the installation of this collection.xconf file into the target location; see .)
Re-indexing
After you have created or modified your collection configuration file, you must
re-index any data that you have. This can be done by executing the following two
XQuery lines (supplying your eXist administrative user's password in place of
myadminpassword, since reindexing requires administrative
privileges):
xmldb:login('/db/apps/terms/data', 'admin', 'myadminpassword'),
xmldb:reindex('/db/apps/terms/data')
You can run this query directly in eXide, or you can also store the following
XQuery script in the app's admin collection and call it via your
browser. The script will login as the administrator and then run the
xmldb:reindex function on the data collection. It also returns the time
used to reindex the collection. For collections that are under 1,000 medium sized
10K byte documents, this script usually runs in a few seconds. Tools are available
for larger collections to schedule indexing during off hours with the eXist job
scheduler.
/db/apps/terms/admin/reindex.xq
xquery version "1.0";
declare option exist:serialize "method=xhtml media-type=text/html indent=yes";
let $data-collection := '/db/apps/terms/data'
let $login := xmldb:login($data-collection, 'admin', 'myadminpassword')
let $start-time := util:system-time()
let $reindex := xmldb:reindex($data-collection)
let $runtime-ms := ((util:system-time() - $start-time) div xs:dayTimeDuration('PT1S')) * 1000
return
<html>
<head>
<title>Reindex</title>
</head>
<body>
<h1>Reindex</h1>
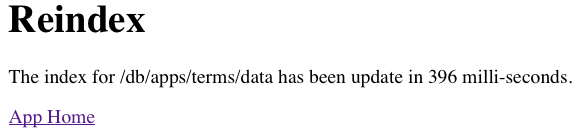
<p>The index for {$data-collection} was updated in {$runtime-ms} milliseconds.</p>
<a href="../index.html">App Home</a>
</body>
</html>The result will be:
The Search Form
The search form is a simple HTML form with one text field input and one submit
button. The action of this form will use the value in the input field and send the
field in the q parameter to the search service.
/db/apps/terms/search/search-form.html
<html>
<head>
<title>
Search Terms
</title>
</head>
<body>
<h2>
Search Terms
</h2>
<form method="GET" action="search.xq">
<label for="q">
Search:
</label>
<input type="text" id="q" name="q" size="30"/>
<input type="submit" value="Search"/>
</form>
</body>
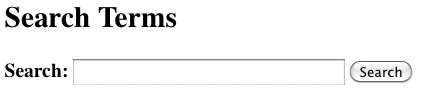
</html>The following image shows a blank search screen form. To perform a search, the user simply enters one or more keywords into the search form and clicks the search button (or presses the enter key):
If you put a keyword in the input field, your browser will request the following URL:
/db/apps/terms/search/search.xq?q=mykeyword
The Search Service
The search service is an XQuery script that calls the full-text search function.
/db/apps/terms/search/search.xq:
xquery version "1.0";
declare option exist:serialize "method=xhtml media-type=text/html indent=yes";
let $data-collection := '/db/apps/terms/data'
let $q := request:get-parameter('q', "")
let $search-results := collection($data-collection)/term[ft:query(*, $q)]
let $count := count($search-results)
return
<html>
<head>
<title>Term Search Results</title>
</head>
<body>
<h3>Term Search Results</h3>
<p><b>Search results for:</b> "{$q}"<b> in collection: </b>{$data-collection}</p>
<p><b>Terms Found:</b> {$count}</p>
<ol>
{
for $term in $search-results
let $id := $term/id
let $term-name := $term/term-name/text()
order by upper-case($term-name)
return
<li>
<a href="../views/view-item.xq?id={$id}">{$term-name}</a>
</li>
}
</ol>
<a href="search-form.html">New Search</a><br/>
<a href="../index.html">App Home</a>
</body>
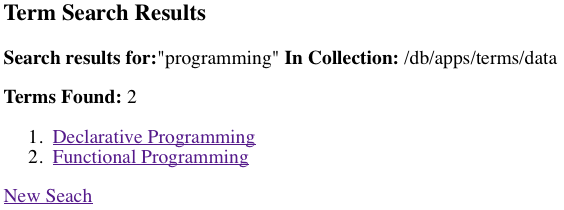
</html>Search Results
The form will then pass the search keyword(s) to the search service. The search service will return a series of search results, with one result per hit. Each result is also a link to the item-viewer service.
Editing
Editing data is the most complex portion of building an XRX application. We will learn how to create a form for users to edit the data and corresponding queries that take the form data and write it to the database. Because of the complexity of creating these interfaces, some advanced XRX frameworks automate this process by generating all of the required files. However, this sample "business terms" app is simple enough that we can create these files from scratch.
The Edit Query
The Edit query is the most complex file in this application. It must perform saves for new items as well as update operations. The following source code should be studied carefully since many of the techniques used in the form will be used in more complex forms.
Model-View-Binding
To understand how the edit.xq script works it is first important to understand how the XForms standard uses Model-View-Binding to associate a user interface control with an XML instance inside the model. This is illustrated in the figure below:
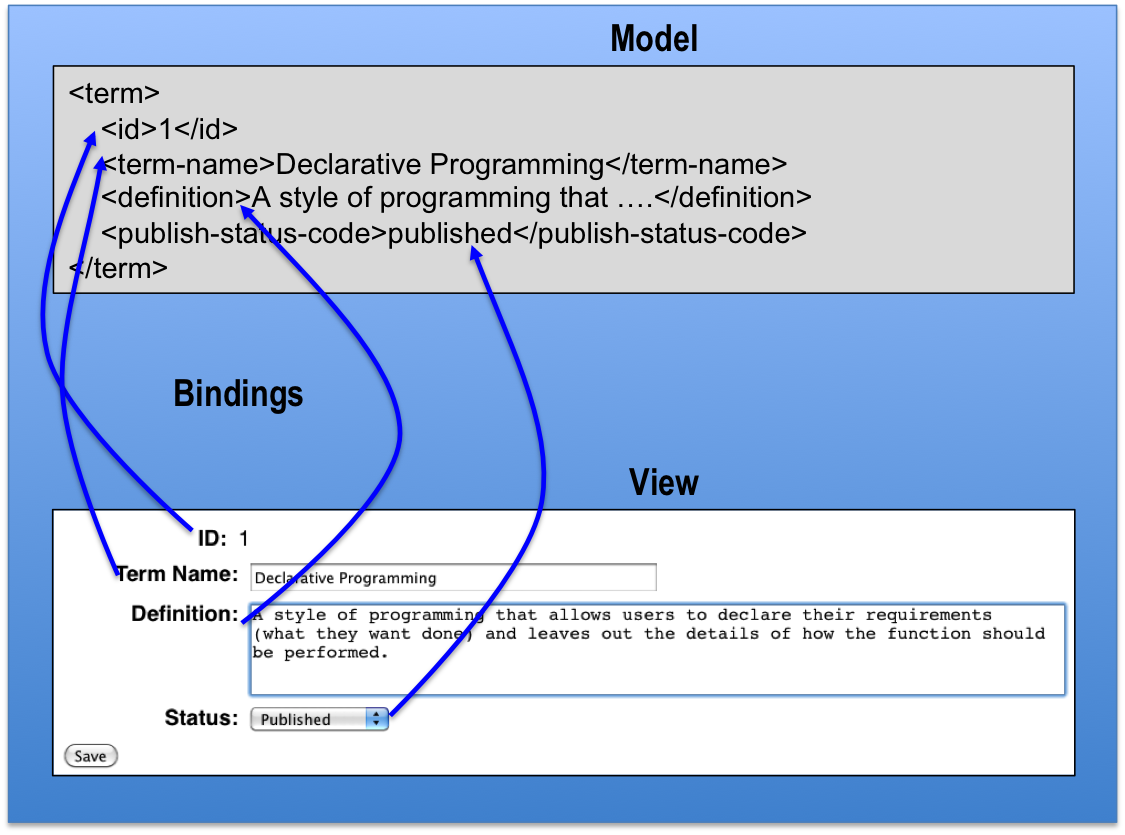
In the form, the XML data that the form allows the user to modify is loaded into
an <xs:instance> element within the <xf:model>. This is specified
using the src attribute. Inside the body of the form, each of the user
interface controls (an output, input,
textarea and select1 control) have a ref
attribute. This attribute contains the XPath expression of the element it
corresponds to within the model.
/db/apps/terms/edit/edit.xq:
xquery version "1.0";

declare option exist:serialize "method=xhtml media-type=text/xml indent=yes process-xsl-pi=no";

let $new := request:get-parameter('new', '')
let $id := request:get-parameter('id', '')
let $data-collection := '/db/apps/terms/data'
let $file :=
    if ($new ne '') then
        'new-instance.xml'
    else
        concat('../data/', $id, '.xml')
let $form :=
    <html xmlns="http://www.w3.org/1999/xhtml"
        xmlns:xf="http://www.w3.org/2002/xforms"
        xmlns:xs="http://www.w3.org/2001/XMLSchema"
        xmlns:ev="http://www.w3.org/2001/xml-events">
        <head>
            <title>Edit Item</title>
            <style type="text/css">
                <![CDATA[
                    @namespace xf url("http://www.w3.org/2002/xforms");

                    body {
                        font-family: Helvetica, Ariel, Verdana, sans-serif;
                    }

                    .term-name .xforms-value {width: 50ex;}
                    .definition .xforms-value {
                        height: 5em;
                        width: 600px;
                    }

                    /* align the labels but not the save label */
                    xf|output xf|label, xf|input xf|label, xf|textarea xf|label, xf|select1 xf|label {
                        display: inline-block;
                        width: 14ex;
                        text-align: right;
                        vertical-align: top;
                        margin-right: 1ex;
                        font-weight: bold;
                    }

                    xf|input, xf|select1, xf|textarea, xf|ouptut {
                        display: block;
                        margin: 1ex;
                    }
                ]]>
            </style>
            <xf:model>
                <xf:instance xmlns="" src="{$file}" id="save-data"/>
                <xf:submission id="save" method="post" action="{
                        if ($new eq 'true') then
                            'save-new.xq'
                        else
                            'update.xq'
                    }" instance="my-task" replace="all"/>
            </xf:model>
        </head>
        <body>
            <h1>Edit Term</h1>
            {
                if ($id) then
                    <xf:output ref="id" class="id">
                        <xf:label>ID:</xf:label>
                    </xf:output>
                else
                    ()
            }
            <xf:input ref="term-name" class="term-name">
                <xf:label>Term Name:</xf:label>
            </xf:input>
            <xf:textarea ref="definition" class="definition">
                <xf:label>Definition:</xf:label>
            </xf:textarea>
            <xf:select1 ref="publish-status-code">
                <xf:label>Status:</xf:label>
                <xf:item>
                    <xf:label>Draft</xf:label>
                    <xf:value>draft</xf:value>
                </xf:item>
                <xf:item>
                    <xf:label>Under Review</xf:label>
                    <xf:value>review</xf:value>
                </xf:item>
                <xf:item>
                    <xf:label>Published</xf:label>
                    <xf:value>published</xf:value>
                </xf:item>
            </xf:select1>
            <xf:submit submission="save">
                <xf:label>Save</xf:label>
            </xf:submit>
        </body>
    </html>
let $xslt-pi := processing-instruction xml-stylesheet {'type="text/xsl" href="/exist/apps/xsltforms/xsltforms.xsl"'}
return
    (
        (: Prevent betterFORM (still enabled by default) from intercepting the form, allowing XSLTForms to handle it :)
        request:set-attribute("betterform.filter.ignoreResponseBody", "true"),
        $xslt-pi,
        $form
    )
Note that this form does "double duty" as both a form for new items and a form for
updating existing items. The new=true parameter must always be passed
to the form when creating a new item. (A more sophisticated production systems would
check for these parameters and return error codes if one or the other is not passed
to the form.) In order to create the new item, the form fetches a document
containing blank fields to be used as a template for the form.
/db/apps/terms/edit/new-instance.xml:
<term>
  <id/>
  <term-name/>
  <definition/>
  <publish-status-code/>
</term>
All XForms hold the form data in the <xf:model> element. This form uses a
single <xf:instance> element within the model to store the data that will
saved when the user clicks the "Save" button. The Save button in XForms is called
the <xf:submit> element. It has a single submission attribute
that is associated with an <xf:submission> element within the model. In our
example above the name of the submission element (its id) is
save. The save submission element is responsible for sending the data
from the XForms client to a specific service on the server. In the example above
there are two slightly different XQuery services, one for saving new items and one
for updating existing items. We will be covering the save-new and the update queries
later in this tutorial.
The query that is used is wrapped inside of the action attribute of
the save submission. Here is the portion from edit.xq with this code:
action="{
    if ($new='true') then
        'save-new.xq'
    else
        'update.xq'
}"
You can see that if the user is creating a new item the data is sent via an HTTP
POST request to the save-new.xq query. If the user does not have a new
item the POST data is sent to the update.xq query.
Although we could have used a single save.xq query, this structure
allows you to trigger different behavior for different functions you may want. For
example, save-new.xq might also trigger an e-mail notification when new
records are saved for the first time, or a versioning routine might be triggered
only when the file is updated.
The next section of code to notice is that the ID element is only displayed using
a read-only <xf:output> element if the form is in update mode.
if ($id) then
    <xf:output ref="id" class="id">
        <xf:label>ID:</xf:label>
    </xf:output>
else
    ()
This shows some of the power of combining XQuery and XForms. In this case we are
using logic on the server to conditionally include portions of the form based on the
context. Contextual indicators such as user, group, and role can be harnessed to
dynamically create forms around the needs of your users. We can use both client and
server logic to determine what features of the form are enabled. (XForms includes a
useful function called <xf:bind> that uses XPath expressions to determine
if certain fields should be displayed.)
Note that there are four different user interface controls in this form. The first
one is a read-only output. The second is the <xf:input> control that
gathers input in a single line. The third is a <xf:textarea> control that
allows users to enter multi-line descriptions for definitions of terms. The last
control is the <xf:select1> control that allows the user to select one
value from a list of values. (For a complete discussion of the XForms controls we
suggest you use the XForms Wikibook at http://en.wikibooks.org/wiki/XForms. The Input Form Controls section goes
through each of the controls in the XForms specification. In addition to the
standard controls there are other controls that can also be integrated directly into
XForms, such as rich-text editors.)
Each of the input controls has a ref attribute that indicates which
element in the instance it is bound to. If you have multiple instances and multiple
models you may not be able to use all the default values as in this example. This
ref attribute is how leaf elements the model get bound to each input control. In
general, when you are building simple, flat forms there is a one-to-one
correspondence between the form elements and the instances in the model. Complex
forms also allow you to have repeating elements so you can add one-to-many
structures in a form. This means that XForms are not restricted to managing a flat
list of elements. They can contain multiple nested elements with elements.
The final part of the form contains the instructions needed to place the XSLTForms processing instruction at the top of the file when it is rendered.
let $xslt-pi := processing-instruction xml-stylesheet {'type="text/xsl" href="/exist/apps/xsltforms/xsltforms.xsl"'}
return ($xslt-pi, $form)
You can also add a directive that will put the XSLTForms system into a debug mode by adding the following:
let $debug := processing-instruction xsltforms-options {'debug="yes"'}
return ($xslt-pi, $debug, $form)
Saving New Items
The save new item process must first access the XML file that stores the next ID to be used to create a unique file name. We store the next ID to be used in a small XML file with only one element in the root called next-id. Here is that file:
/db/apps/terms/edit/next-id.xml:
<data>
  <next-id>
    6
  </next-id>
</data>
The <next-id> element is updated using an XQuery "update function" when
new items are saved to the data collection. We save the file using the number as the
filename; in this case, the next file saved will be 6.xml. After the
file is saved, the "next-id" number is incremented to 7. (This is similar to the
auto-increment function in many other databases. Using an arbitrary number as an ID
is sometimes called a "surrogate key" since it is external to the actual data in the
XML file.)
/db/apps/terms/edit/save-new.xq:
xquery version "1.0";

declare option exist:serialize "method=xhtml media-type=text/html indent=yes";

let $app-collection := '/db/apps/terms'
let $data-collection := '/db/apps/terms/data'

(: get the form data that has been "POSTed" to this XQuery :)
let $item := request:get-data()

(: get the next ID from the next-id.xml file :)
let $next-id-file-path := concat($app-collection, '/edit/next-id.xml')
let $next-id := doc($next-id-file-path)/data/next-id/text()
let $file := concat($next-id, '.xml')

(: log into the collection :)
let $login := xmldb:login($app-collection, 'admin', 'myadminpassword')

(: create the new file with a still-empty id element :)
let $store := xmldb:store($data-collection, $file, $item)
let $new-document := doc(concat($data-collection, '/', $file))

(: add the correct ID to the new document we just saved :)
let $update-id := update value $new-document/term/id with $next-id

(: update the next-id.xml file :)
let $new-next-id :=  update value $next-id with $next-id + 1

(: we need to return the original ID number in our results,
   but the previous update expression increased $next-id by 1 :)
let $original-id := $next-id - 1

return
<html>
    <head>
        <title>Save Conformation</title>
    </head>
    <body>
        <a href="../index.xhtml">Term Home</a>
        <p>Term {$original-id} has been saved.</p>
        <a href="../views/list-items.xq">List all Terms</a>
    </body>
</html>
Updating Existing Items
The update function is simpler than the save function, since it does not have to worry about creating a new file and incrementing a counter. It simply takes the incoming POST data and stores it in the file. Note that by default this means that the entire data file is updated and re-indexed upon the store operation.
/db/apps/terms/edit/update.xq:
xquery version "1.0";

declare option exist:serialize "method=xhtml media-type=text/html indent=yes";

let $title := 'Update Confirmation'
let $data-collection := '/db/apps/terms/data'

(: get the form data that has been "POSTed" to this XQuery :)
let $item := request:get-data()

(: log into the collection :)
let $login := xmldb:login($data-collection, 'admin', 'myadminpassword')

(: get the id out of the posted document :)
let $id := $item/term/id/text()

let $file := concat($id, '.xml')

(: save the new file, overwriting the old one :)
let $store := xmldb:store($data-collection, $file, $item)

return
    <html>
        <head>
            <title>{$title}</title>
        </head>
        <body>
            <h1>{$title}</h1>
            <p>Item {$id} has been updated.</p>
        </body>
    </html>
Deleting
Deleting items is even simpler than editing items. There are only two files that we will need to create. Each of them takes a single REST parameter. The first file is a confirmation XQuery script that just asks the user "Are you sure you want to delete this term?" The second script actually performs the deletion.
Confirming Delete
The delete confirmation script takes the ID of the item to be deleted and selects
the document using the doc() function. It then presents the user with
details about the item and displays two choices. One to delete and the other to
cancel the action. A CSS file can be used to color the links appropriately with a
red warning indicator.
/db/apps/terms/edit/delete-confirm.xq:
xquery version "1.0";
declare option exist:serialize "method=xhtml media-type=text/html indent=yes";
let $id := request:get-parameter('id', '')
let $data-collection := '/db/apps/terms/data/'
let $doc := concat($data-collection, $id, '.xml')
return
<html>
<head>
<title>Delete Confirmation</title>
<style>
<![CDATA[
.warn {
background-color: silver; color: black; font-size: 16pt;
line-height: 24pt; padding: 5pt; border: solid 2px black;
}
]]>
</style>
</head>
<body>
<a href="../index.xhtml">Item Home</a> > <a href="../views/list-items.xq">List Items</a>
<h1>Are you sure you want to delete this term?</h1>
<strong>Name:</strong> {doc($doc)/term/term-name/text()}<br/>
<strong>Path:</strong> {$doc}<br/>
<br/>
<a class="warn" href="delete.xq?id={$id}">Yes - Delete This Term</a><br/>
<br/>
<a class="warn" href="../views/view-item.xq?id={$id}">Cancel (Back to View Term)</a>
</body>
</html>The Delete Script
The delete script also takes a single REST parameter of the ID
/db/apps/terms/edit/delete.xq:
xquery version "1.0";
declare option exist:serialize "method=xhtml media-type=text/html indent=yes";
let $data-collection := '/db/apps/terms/data'
(: get the id parameter from the URL :)
let $id := request:get-parameter('id', '')
(: log into the collection :)
let $login := xmldb:login($data-collection, 'admin', 'myadminpassword')
(: construct the filename from the id :)
let $file := concat($id, '.xml')
(: delete the file :)
let $store := xmldb:remove($data-collection, $file)
return
<html>
<head>
<title>Delete Term</title>
<style>
<![CDATA[
.warn {
background-color: silver; color: black; font-size: 16pt;
line-height: 24pt; padding: 5pt; border:solid 2px black;
}
]]>
</style>
</head>
<body>
<a href="../index.xhtml">Terms Home</a> > <a href="../views/list-items.xq">List Terms</a><br/>
<h1>Term id {$id} has been removed.</h1>
</body>
</html>The Application Home Page
A simple application home page can be a description of the application and a static list of links to the main entry points of the application: the item listener, the search form, the create new and the re-index. The index page can be a static HTML page as describe below.
/db/apps/terms/index.html:
<html>
  <head>
    <title>
      Terms
    </title>
  </head>
  <body>
    <h1>
      Terms
    </h1>
    <ul>
      <li>
        <a href="views/list-items.xq">
          List Items
        </a>
      </li>
      <li>
        <a href="search/search-form.html">
          Search
        </a>
      </li>
      <li>
        <a href="edit/edit.xq?new=true">
          Create New Term
        </a>
      </li>
      <li>
        <a href="admin/reindex.xq">
          Reindex the collection
        </a>
      </li>
    </ul>
  </body>
</html>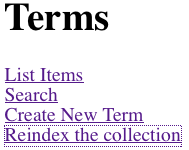
Next Steps
As you have now learned all of the CRUDS functions, you are ready to move on the some more complex examples. Here are some suggestions for next steps you can take.
Create an XQuery module to centralize some of the common code and reduce duplication and then reference these functions in each of your queries. For example, you could put the HTML boilerplate into a style module. You could also explore eXist's HTML templating module.
Change the
list-items.xqto use HTML tables to view each item.Use the eXist permission system to create a group called "term-editor" and a group called "term-admin". Change the group permissions on the edit and admin collections to only allow users in these groups to be able to access these collections.
In the
list-items.xqquery, use XQuery sequences to pre-sort items and then display only an initial subset of the data using the subsequence function.Add URL parameters
startandper-pageto the list-items to indicate what record to start to display and how many records to display.Learn how to create one-to-many relationships in your forms using the
<xf:repeat>element. For example, create a form that allows you to add multiple phone numbers to a contact record or multiple authors to a book entry.Learn how to use XForms binding to conditionally display elements in a form.
Get fancy with how tables of data are displayed. Add sorting to table columns.
Create forms that manage document work flows. Add work flow steps that flow to the right as they expand.
Create advanced search forms that use multiple selection criteria such as document types, authors or date ranges.
Create complex business logic in how selection lists can be controlled. Use one selection list to control the values of a second selection list.
Move all of the codes in the publish-status selection list into an XML file and place it in a collection called
code-tables. Then add an instance to the form that reads this code table into the form.Write an XQuery function that will take a status code's value and return its label.
Modify the collection configuration file for the
/db/apps/terms/datacollection to enable versioning when items are updated. See Versioning Extensions.
References
All of these topics and many more are covered in the XQuery, XForms and XRX Wikibooks. You can use the search tools within each Wikibook to find how specific elements are used within each of the examples.
Wiki Books:
Dan McCreary
Dan McCreary
Chris Wallace; Dan McCreary
Articles:
Jeni Tennison
XRX: Simple, Elegant, Disruptive
Dan McCreary
Books:
XQuery
Priscilla Walmsley (2007)
XForms Essentials
Micah Dubinko (2003)