Advanced Installation Methods
The eXist-db Basic Installation article describes how to install and start eXist-db for basic usage. This article explains more advanced methods of installing and running eXist, for instance for a headless (no GUI) system, running it as a service, etc.
Headless Installation
The Basic Installation of eXist-db
requires a graphical desktop. You can also install eXist on a headless (no GUI) system.
For this launch the installer from the command line, using the -console
option:
java -jar eXist-{version}.jar -consoleIn console mode, the installer will prompt for several parameters (almost like the GUI version does). A dump of a sample interaction is shown below:
$ java -jar exist-installer/target/exist-installer-5.0.0-RC8-SNAPSHOT.jar
Select target path [/Users/wolf/Source/trunk/eXist]
/Applications/eXist/
press 1 to continue, 2 to quit, 3 to redisplay
1
Set Data Directory
Please select a directory where eXist will keep its data files. On Vista and Windows 7, this should be outside the usual 'Program Files' directory:
Data dir:  [data]

press 1 to continue, 2 to quit, 3 to redisplay
1
Set Admin Password
Enter password:  []
xyz
Enter password:  [xyz]
xyz
------------------------------------------

Max memory in mb: [1024]

Cache memory in mb: [128]

press 1 to continue, 2 to quit, 3 to redisplay
1
[ Starting to unpack ]
[ Processing package: Core (1/13) ]
[ Processing package: Sources (2/13) ]
[ Processing package: Apps (3/13) ]
[ Processing package: bfDemos (4/13) ]
[ Processing package: bfReferences (5/13) ]
[ Processing package: dashboard (6/13) ]
[ Processing package: demo (7/13) ]
[ Processing package: doc (8/13) ]
[ Processing package: eXide (9/13) ]
[ Processing package: fundocs (10/13) ]
[ Processing package: shared (11/13) ]
[ Processing package: xsltforms (12/13) ]
[ Processing package: xsltforms-demo (13/13) ]
[ Unpacking finished ]
[ Starting processing ]
Starting process Setting admin password ... (1/1)
--- Starting embedded database instance ---
File lock last access timestamp: 30.12.2012 /Applications/eXist/data/dbx_dir.lck
Found a stale lockfile. Trying to remove it:  /Applications/eXist/data/dbx_dir.lck
File lock last access timestamp: 30.12.2012 /Applications/eXist/data/journal.lck
Found a stale lockfile. Trying to remove it:  /Applications/eXist/data/journal.lck
Dez 30, 2012 10:13:26 PM org.expath.pkg.repo.util.Logger info
INFO: Create a new repository with storage: File system storage in /Applications/eXist/data/expathrepo
Setting admin user password...
--- Initialization complete. Shutdown embedded database instance ---
[ Console installation done ]
Multi-container environments
We highly recommend configuring a docker-compose.yml for local development or integration into multi-container environments.
# starting eXist-db
docker-compose up -d
# stop eXist-db
docker-compose down
You can see an example configuration file below. Note that e.g.${EXIST_DATA_DIR} can be passed from an external file, and the use of the volume instructions. For all the available options please consult the docker compose documentation.
version: '3.6'
services:
  exist:
    image: existdb/existdb:release
    container_name: exist
    ports:
        - 8080:8080
        - 8443:8443
    networks:
      - www
    volumes:
      - type: volume
        source: data
        target: ${EXIST_HOME}/${EXIST_DATA_DIR}
      - type: volume
        source: config
        target: ${EXIST_HOME}/${EXIST_CONFIG_DIR}

volumes:
  data:
    driver: local
    name: exist-data
  config:
    driver: local
    name: exist-config

networks:
  www:
    name: www
    driver: bridge
Running eXist-db as a Service
Instead of manually running the eXist-db server in a shell window, you can run it as a background service which is automatically launched during system start-up. This can be convenient, especially for servers. eXist-db continues to run even after users have logged off.
Windows
On Windows there are three identical options:
Choose Install eXist-db as Service from the eXist-db's system tray application.
Choose Install eXist-db as Service from eXist-db's entry in the Windows start menu.
Installing eXist-db as a service on Windows requires full administrator rights.
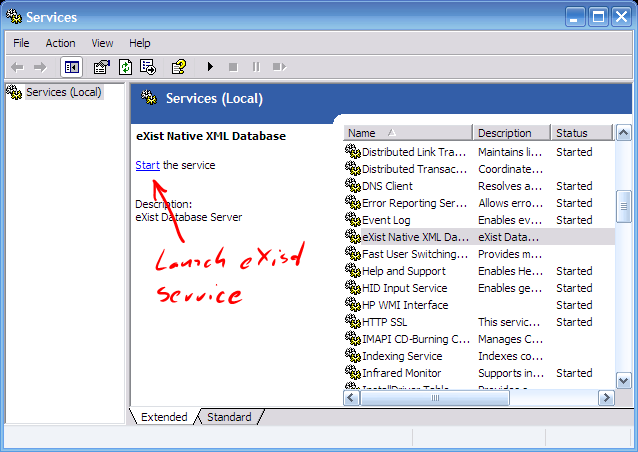
After installing eXist-db as a service, you'll find eXist-db in the list of services registered with Windows:
Unix/Linux
If your system supports systemd you can run the service wrapper as a
non-privileged user.
Begin by creating a new user in your system which is being created specifically to run eXist-db as a service. You can do this by typing the following command:
sudo useradd --system --shell /sbin/nologin --comment "eXist-db Service Account" existdb
To follow the examples here this user is part of an existdb user group:
sudo groupadd existdb
This command creates a new system user named "existdb" which does not need to
login in order to run a service. In order for this new system user to be able to run
eXist-db, we need to change the permission of eXist-db to match this new user. You
do so by navigating to your $EXIST_HOME folder and typing the
following two commands:
sudo chown -R existdb:existdb .
These two commmands modify the ownership and group permissions recursively
throughout the whole eXist-db project to your new existdb system user. Now only this
user can run eXist-db. Next, navigate to the /etc/systemd/system
sub-directory. Once there, create an existdb.service file which contains the
following information at a minimum:
[Unit]
Description=eXist-db Server
Documentation=https://exist-db.org/exist/apps/doc/
After=syslog.target

[Service]
Type=simple
User=existdb
Group=existdb
Environment="JAVA_HOME=/path/to/jdk8"
Environment="JAVA_OPTS=-XX:+UseG1GC -XX:+UseStringDeduplication -XX:MaxRAMPercentage=75.0"
ExecStart=/path/to/exist-5.0.0/bin/startup.sh

[Install]
WantedBy=multi-user.target
Once this file is stored in this location, you need to update permissions. Give ownership of this file to the exist user by using the following commands:
sudo chown existdb:existdb existdb.service
You can then install the existdb service, by runniung sudo systemctl daemon-reload && sudo systemctl enable existdb.
If you then want to start eXist-db as a service, run sudo systemctl start existdb.
Below is a list of common commands to interact with the newly created and configured service:
sudo systemctl start existdb- Enter command to start eXist-dbsudo systemctl stop existdb- Enter command to stop eXist-dbsudo systemctl enable existdb- Enter command to enable eXist-db to automatically start running after a reboot of your systemsudo systemctl disable existdb- Enter commande to disable eXist-db from automatically starting after a reboot of your systemsudo systemctl restart existdb- Enter command to restart eXist-dbsystemctl status existdb- Enter command to check the status of eXist-dbjournalctl- Run the following command to check systemd journal
Alternatives for scripts in the bin Directory
Included in the distribution are a number of useful .sh (Unix
Shell) and .bat (Windows batch) programs located in the
bin sub-directory. Their names speak for themselves.
However, if you find that programs do not launch, you can try to manually launch them on the command-line without the scripting wrapper. This often provides useful debugging information.
To manually launch these scripts, give the following commands:
-
startup.sh(Unix) /startup.bat(Windows) Starts the included Jetty web server at port 8080. eXist runs as a web application, located at http://localhost:8080/exist/. For further options have a look at the following section about command line flags.
-
shutdown.sh(Unix) /shutdown.bat(Windows) shutdown.sh -p youradminpassword
Closes the running instance of eXist. If eXist has been started with
startup.sh, callingshutdown.shwill also stop the Jetty web server. Otherwise, only the database is stopped by this call (since eXist has no control over the environment in which it is running). You should always callshutdownbefore killing the server process.-
client.sh(Unix) /client.bat(Windows) Use one of these scripts to launch the Java Admin Client.
Command line flags to set host, ports and configuration
There are several java tool options available to change the host, http and https port on which existdb will listen.
-
jetty.host controls on which IP jetty binds to (default is 0.0.0.0)
-
jetty.http.port controls on which port jetty will listen for HTTP-requests (default is 8080)
-
jetty.ssl.port controls on which port jetty will listen for HTTPS-requests (default is 8443)
-
JAVA_OPTS='-Djetty.host=127.0.0.1 -Djetty.http.port=9999' startup.sh Example for linux/unix:
Starts the included Jetty web server at port 9999 that will only listen on the local IP 127.0.0.1. eXist runs as a web application, located at http://127.0.0.1:9999/exist/.